Monday, August 31, 2009

bushido and Fabrication, Japanese sword making, conclusion.

Often as a project draws to a close my interest wanes and I slow down. This was not the case with this project. I sprinted over the finish line on this one. After completing all the components, I was very excited to assemble the final piece. 

Before assembly began I had to put a finish on the scabbard (saya). Sayas are traditionally finished in a variety of ways. Lacquer is one of the more common finishes. I decided to go with modern automotive enamels instead of a traditional lacquer finish. I made this decision for a couple reasons. Firstly, traditional lacquer is a process that I am not familiar with-- and I knew I could replicate the look of a lacquer finish with enamels. Secondly, lacquer is quite toxic-- I did use clear lacquer on the metal fittings but it is becoming increasingly hard to find lacquer here in California. The finish on the saya is a combination of four different enamels layered to give the look of lacquer with gold powder embedded in it. I also applied several coats of clear top coat.

The final assembly mostly involves lacing the hilt (tsuka) with a silk cord material called ito. I managed to hunt down instructions on how to lace a tsuka online. These are the best instructions out there. Silk ito comes in a variety of colors. I settled on a color called tetsu which is the Japanese word for iron. The color is a very dark gunmetal blue. I also ordered some tetsu ito in a wider size to use as the lanyard for the saya-- also known as a sageo. The sageo was tied in a fancy knot known as the ronin knot. Now please enjoy a some pictures of the finished project:


Thanks for following this project with me. I am quite satisfied with the results however there are things I learned, and things I would do differently. In the end it was a rewarding study of traditional Japanese sword making techniques.

Thanks for looking.

Monday, August 24, 2009

Toy of the Week Monday, August 24, 2009

Sometimes the level of sophistication in a Japanese toy alone is enough to make me purchase it.  When I happened across this vintage 1980's robot in a specialty shop in an outer ring suburb of Saint Paul MN, I knew I had to have it-- not for the design of the robot, but for the construction.  This minuscule marvel was like nothing I had ever seen in an American toy.  
First of all, it was made entirely of metal.  It had a satisfying weight, and it felt cold in my hand.  It's tiny joints were movable-- in fact its shoulders move in multiple axes-- all told this robot has an incredible FIFTEEN points of articulation.  The robot is held together with small screws and steel pins.  There are also some details on the robots back that are machined from solid metal stock-- a construction practice that is never seen on American toys.  The packaging was befittingly tiny, but impressively high quality.  when you remove the inner box from it's cardboard sleeve you realize that the robot is in fact packaged in a miniature hard plastic case with a clear hinged cover.  Neatly stowed in the case next to the robot is a tiny metal sword.

This is without question the smallest robot in my entire collection, yet it still manages to be one of the most impressive.  It is worth a closer look so I invite you to saunter into the Robots gallery of the Cabinet of Curious Frivolities and thoroughly inspect Dynaman Metal Roboss.

Full steam ahead...

Thursday, August 20, 2009

bushido and Fabrication, Japanese sword making part 4

So far my tasks on this project have been pretty basic.  I picked out a blade, forged and filed some copper and carved some wood, but my next task was a bit more complicated.  There are four more metal fittings on a Japanese sword, and I had to make each one by hand.  The fittings I made were the shitodome (pommel),  fuchi (collar), tsuba (guard) and the seppa (spacer).  These metal fittings are often referred to as "furniture" for the sword and they are considered to be an art form unto themselves.  Authentic examples of antique sword furniture are prized by collectors and many examples in museums are considered to be national treasures of Japan.  I decided to fabricate the fittings from metals that I could easily form and solder.  I chose brass and copper.  Copper can be easily softened through heat treatment (annealing), as I mentioned in part 2, and brass can be easily machined and filed.

The fuchi, seppa and tsuba all needed a slot in the center to accommodate the blade.  The cross section of my blade is rectangular so I needed rectangular slots in all these parts.  The first thing I did was sandwich together two pieces of 1/32" brass and one piece of 3/16" brass.  The 3/16" material would become the tsuba, one piece of 1/32" material would be come the seppa and the other one would become the top plate of the fuchi. 
 
The sandwich was soldered together with low temp solder.  Then I clamped it in the vise of the milling machine.  I used a 1/8" mill bit to cut the slot in the center of the sandwich.  
The ends of the slot were squared out with files.  Lastly, I took a torch to the sandwich and separated the pieces.  

After making these parts I then started forming the copper for the fuchi and shitodome.  This process is very similar to making the habaki.  The copper is softened and tapped to shape around the wood hilt.
  I was essentially making two collars that would fit the hilt.  
Once the copper collars were formed to fit, I soldered the seams shut with high temp silver solder.  The shitodome had a piece of 1/8" thick brass soldered on top of it to make it into a cap.  I then soldered one of the slotted pieces on top of the fuchi.  The next step involved a lot of filing and shaping to make these pieces into smooth rounded parts.  After they were shaped I bead blasted them with glass beads.  I then attached gold plated dragonfly and leaf ornaments to them.  The seppa was cut to shape and then the edges were hand filed into a braided pattern.  It was then buffed with a Scotch Brite pad.
The final step was to hand brush black enamel onto all of the fittings and then apply three coats of clear lacquer.  In the picture above from left to right you can see the finished shitodome, the fuchi, the tsuba and the seppa is the brass part in the foreground.  The fittings came out pretty nice.  They wound up looking like machine made parts.  In the end, making these parts was a very rewarding process-- though I will admit it was a lot of work.  At this stage things became very exciting because there was only one more task to do: finishing and final assembly.  Check back soon for part 5-- the finale of this project.  Thanks for looking.

Sunday, August 16, 2009

toy of the week Monday, August 16, 2009

Enshrouded in a cloud of dust and the din of clattering metal, threshing machines were the standard method by which grain was processed for well over 100 years. Early models, produced in the mid-late 1800's, were small and made from wood. Later, with the introduction of steam engines on farms, the machines became larger and capable of processing more grain in less time. Larger machines had iron sides. In 1904, the J. I. Case corporation revolutionized the market by producing an all steel thresher with galvanized sides.

I was introduced to threshing machines at an early age in rural Minnesota. My Grandparents were farmers. My mother describes families in their town still using threshing machines when she was a little girl. Indeed threshing machines were still being manufactured even into the 1960's The development of the combine harvester ultimately led to the demise of the thresher. For me, these machines were curiosities and dinosaurs of the past. Like many farm implements that have descended into obsolescence, you could see them rusting away in the corner of a field. This sight was more common than you might think.

Some of these machines have survived and, at an early age, I was lucky enough to see one operating at an antique tractor show. This was also my first close encounter with a steam engine. Giant clanking Case steam tractors were barking out loud rhythmic beats of exhaust and blasting whistles in a white cloud of steam. It was a feast of mechanical motion, sounds and smells. Steam power had instantly captivated me. No doubt this early experience has contributed to my love of mechanical things-- which has heavily influenced my hobbies and career.

Nearly 30 years later, in 2007, I had recently acquired a 1/20 scale live steam tractor. And I set out to find a companion for it. The tractor will have to be added to the Cabinet of Curious Frivolities later. Today I am bringing you an extremely rare hand made toy. This impressive metal masterpiece was meticulously fabricated out of real galvanized steel. It is 18" long. There are not very many of these in existence. When I bought it from Al's Farm Toys I was told that a guy in Minnesota who won the state lottery builds each one by hand-- like an individual piece of art. He makes them because he loves threshing machines-- not for money. The vast majority of his creations have been sold at auction, mostly in Midwestern cities like Minneapolis and Chicago. A few examples make it into specialty shops.

I cant leave anything alone so I have added some custom details to this toy. When I am at live steam meets (steamups), the threshing machine gets more questions than any of my other models. If your curiosity has been piqued then I invite you to take a gander inside the Machinery gallery at the mechanical beauty of the 1/16 Scale Custom Case Threshing Machine. You can also see a mediocre video of a thresher in operation here. God bless YouTube.

Full steam ahead.

Saturday, August 15, 2009

Bushido and Fabrication, Japanese sword making part 3

There are certain parts of any project that are like slipping into a really comfortable pair of shoes.  For me that is wood working.  Making the scabbard (saya) and the hilt (tsuka) is, for me, a perfect blending of precise geometric woodworking and organic wood sculpting.  My tanto blade has a tang (handle) that tapers in thickness so I laminated wood veneers directly on the tang so the tsuka would have a tight fit.  On Japanese swords the tsuka is secured to the blade with a conical bamboo pin.  Once all the veneers were glued and laid up, I drilled the hole for the pin and shaped the tsuka into a smooth rounded cross section with rasps and sand paper.  The tsuka of tantos are typically covered in stingray skin which was considered to be a luxury material from southern Japan.  I obtained a stingray hide from a vendor in Los Angeles I cut two pieces of Stingray skin and inlaid them into the sides of tsuka.  In the top picture you can see the tsuka.  The ray skin is the brown material on the sides.  The saya is in the foreground which I will describe next.

To make the saya I selected two pieces of wood.  The blade was placed on one of the wood pieces and traced with a pencil.  The void that the blade occupies is traditionally carved out with chisels.  I decided to use a router because I could achieve the same result much faster.  As I mentioned in the last post the blade floats loosely in the saya so I cut out the space to be a loose fit everywhere except where the habaki would rest.  I would adjust the fit to the habaki with files once the saya was finished.  Once the void was carved out I glued a second piece of wood to the top.  The outside outline was then cut on a band saw and the saya was smoothed and shaped in the same way as the tsuka.
Making the wood parts was fun and quick, and In the last photo, you can see I achieved a nice fit of the blade in the saya.  The next part of the project definitely has me stepping outside of my comfort zone.  Making the habaki was good practice for the next phase where I will be making four different metal fittings.   Stay tuned...

Thursday, August 13, 2009

Bushido and Fabrication, Japanese sword making part 2

With a tanto blade in my possession, as I mentioned in the part one, I decided to focus on making one of the metal fittings.  Japanese swords do not fit tightly in their scabbards.  The scabbards (saya) are made from wood and the blade floats inside them.  This protects the valuable surface polish and keeps the blade from getting stained or scratched.  To secure the sword tightly in the saya a wedge shaped collar called the habaki was employed.  The collar is installed right at the base of the cutting edge.  Traditionally the habaki was made from copper.  The copper was sometimes jacketed in gold.  I decided to go for a more utilitarian design and leave the raw copper color.  

The construction practice that I used is very traditional.  It essentially consists of heating a strip of copper until it is red hot, allowing it to cool, and then forming it by tapping it with a small hammer.  The copper quickly re hardens so you must slide it off of the blade and heat it repeatedly.  I heated the collar about ten times before it was completely formed.  The habaki is formed directly around the blade itself.  This way you get an absolutely precise fit.  In Japan this is only done by the most experienced artisans because you are literally hammering a piece of metal just millimeters from a finished blade.  Once the habaki was formed I silver soldered the seam closed.  The last step is to file and shape it so that is has pleasing lines that compliment the blade.  I also put a protective coat of clear lacquer over it so the copper would not tarnish.
It was at this time that I oiled the blade and wrapped it with fabric to protect it from corrosive skin oils.  This also serves to protect me from the sharp edge of the blade.  

The next step will be to fabricate the wood parts: the scabbard and hilt.  Stay tuned...

Monday, August 10, 2009

Toy of the week Monday, August 10, 2009

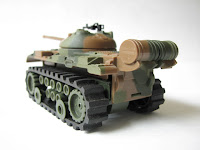
My brother and I created epically scaled strategic deployments of green plastic soldiers. That was one of our favorite activities. Having the largest platoon of little plastic army guys was a true badge of honor when we were kids. In a huge technological advance, our molded plastic armies received reinforcements in the way that only the raw power a double "A" battery could provide. Despite our generally peaceful household, our ex-hippie parents temporarily cast aside their ideals and bought my brother and I battery-powered Stomper tanks. Soon these motorized marvels became one of our favorite toys. We would test the tanks' terrain tackling prowess by running them through a barrage of backyard obstacles. Puddles, rocks, dirt, sticks-- there was a true sense of achievement when your tank came through unscathed.

In a previous post, I mentioned how, in 1980, the Schaper company, of Minneapolis MN, had created a hugely successful line of battery-operated trucks called Stomper 4x4's. Stomper trucks were pretty cool but the coolness factor skyrocketed in 1983, when they launched a line of Stomper military vehicles that included three different styles of tanks.

Stomper tanks had a lower gear reduction than the wheeled Stomper vehicles giving them more power and a lower speed. They also ran on a larger chassis than the trucks. In 1984 they expanded the line once more to include two different half tracks and an additional style of tank. The half tracks are by far the rarest of all the Stomper military vehicles. Examples pop up on eBay occasionally. They typically fetch $30-$40. Recently a German Stomper half track showed up that was mint in package. The seller had set an absurdly high buy-it-now price of $299. By the time the auction ended, the bidding had gone up to $125 and the reserve had still not been met. The item was not re-listed.


Fortunately you do not need to spend $30-$40 on eBay because I have examples of every type of Stomper tank or half track produced from 1983 to 1988. Just march into the Stomper Military Tanks and Half Tracks gallery in the Stomper 4x4 section of the Vehicles gallery and you can do a full inspection of these vintage mini military machines in the Cabinet of Curious Frivolities.

Full steam ahead.